
Image Source: Google
Laundry can often be a tedious and time-consuming chore, but with the right tools and organization, it can become a much more manageable task. One key element in creating an efficient laundry routine is having a designated space for your dryer that maximizes functionality and minimizes clutter. This is where a simple yet effective solution like a dryer wall box can make a significant difference.
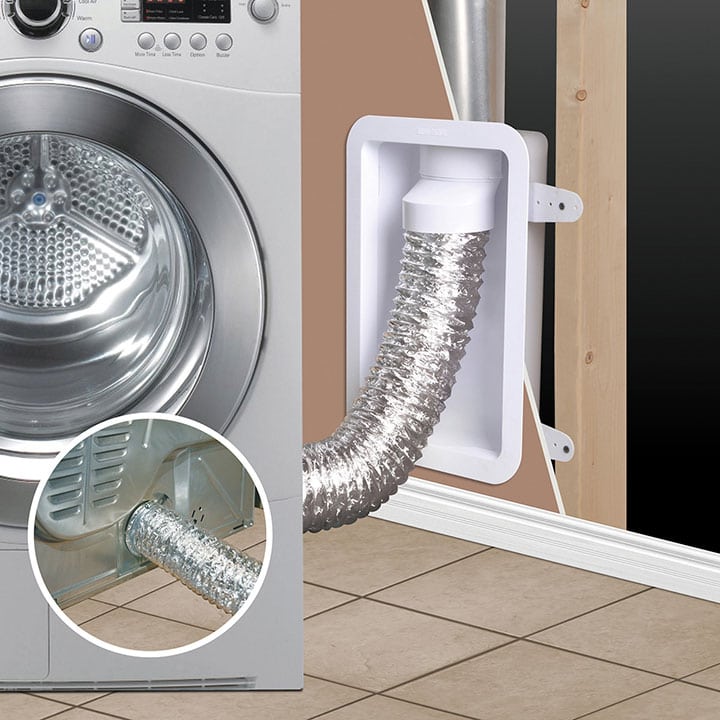
The Benefits of a Dryer Wall Box
Installing a dryer wall box in your laundry area can offer a variety of benefits that can streamline your laundry routine and make the process more convenient and organized. Some of the key advantages include:
- **Improved Safety:** A dryer wall box helps ensure proper ventilation for your dryer, reducing the risk of fire hazards.
- **Space-Saving:** By recessing the dryer connection into the wall, a wall box helps save valuable floor space in your laundry room.
- **Clean Aesthetic:** The sleek design of a dryer wall box conceals the dryer connection, giving your laundry area a neat and tidy appearance.
- **Easy Access:** With the dryer connection neatly tucked into the wall, accessing and maintaining the dryer becomes much easier.
- **Prevents Hose Kinks:** The wall box allows the dryer hose to run straight from the dryer to the wall without kinking or bending, improving efficiency.
How to Install a Dryer Wall Box
Installing a dryer wall box is a straightforward process that can be done relatively quickly with the right tools and materials. Here are the basic steps to follow:
Materials Needed:
- **Dryer wall box kit (includes box, trim ring, and mounting screws)
- **Screwdriver
- **Utility knife
- **Measuring tape
- **Pencil
- **Drywall saw (if necessary)
Installation Steps:
- **Turn off the power to the dryer and unplug it from the outlet.
- **Locate the ideal position for the dryer wall box on the wall behind the dryer.
- **Trace the outline of the box on the wall and cut out the opening using a utility knife or drywall saw.
- **Insert the dryer wall box into the opening and secure it to the wall using the mounting screws provided.
- **Attach the trim ring to the box to give it a finished look.
- **Connect the dryer vent hose to the wall box and the dryer, then plug the dryer back into the outlet.
- **Turn on the power to the dryer and test the connection to ensure everything is working properly.
Tips for Maintaining Your Dryer Wall Box
Proper maintenance of your dryer wall box is essential to ensure its longevity and performance. Here are some tips to help you keep your wall box in good condition:
- **Regular Cleaning:** Clean the dryer wall box and the surrounding area to prevent lint buildup, which can pose a fire hazard.
- **Inspect for Damage:** Periodically check the wall box for any signs of damage or wear and tear, and repair or replace as needed.
- **Monitor Ventilation:** Ensure that the dryer vent hose is properly connected to the wall box and is not blocked to maintain optimal airflow.
- **Check for Leaks:** Look for any leaks or moisture around the dryer wall box, as this could indicate a problem with the connection.
Conclusion
Transforming your laundry routine from chaos to order is possible with the help of a simple yet effective solution like a dryer wall box. By installing this practical accessory in your laundry area, you can enjoy improved safety, space-saving benefits, and a clean aesthetic while simplifying the maintenance of your dryer. With the right tools and proper maintenance, a dryer wall box can be a game-changer in enhancing the functionality and organization of your laundry room.